More than a Perkins Brailler: A Review of the Mountbatten Brailler, Part 1
The Mountbatten Brailler is not new technology, since it has been available since 1991. But for some reason, even though I have had access to one, I had never taken the time to play around with it. What I had thought of as simply an electronic braillewriter is now so much more. Over the years since its introduction, many features have steadily been added that increase the versatility of the device. This review covers what the Mountbatten does now and what place it may have in the classroom, both for beginners (in Part 1) and for more advanced students (in Part 2).
Out of the Box
The manufacturer provided me with a demonstration model of the Mountbatten Pro. The Pro is the top-of-the-line unit and has the most functionality of the three models that are available (the basic Mountbatten Writer, the Mountbatten Writer Plus, and the Mountbatten Pro). The unit I received also came with a visual read-out device, called the MIMic, and its connection cord. The MIMic, a small box with a screen that connects to the Mountbatten through a serial port, allows a teacher to read visually in print what is brailled on the Mountbatten. Also in the box was a power cord and two additional cables that could be used to connect the unit to peripherals, such as a personal computer.
It was easy to set up the unit with the MIMic attached by following the directions and diagrams in the manual. The various slots are easy to locate and use. The toggle switch to turn on the Mountbatten is in the front left corner, and the toggle switch for the MIMic is on the back of that unit. The MIMic must be turned on separately from the Mountbatten.
At first glance, the Mountbatten looks like a larger and more colorful Perkins Brailler (it is 3.54 inches high by 9.44 inches deep by 17.7 inches wide), with its kid-friendly yellow panel, black keys for the braille dots, and bright blue buttons. The blue buttons are a clue that the Mountbatten does more than just directly emboss braille. The diagrams and text that accompany the unit indicate that while one blue button is the familiar Backspace key, the extra buttons are left and right Function keys, a Command key, and an Enter key. Below the braille keys, where the spacebar is on the Perkins Brailler, are two thin keys—also blue; the right key puts a space between words, and the left key moves the paper to the next line and the embossing head back to the left. Another immediate reminder that the Mountbatten is more than just an electric Perkins Brailler is the voice that greets you with a cheerful "G'day!" when the unit is turned on (the Mountbatten is manufactured in Australia by Quantum Technology). The Mountbatten also announces its battery status and which mode it is in.
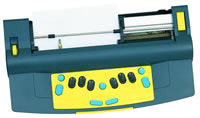
Caption: The Mountbatten Brailler looks like a larger and more colorful Perkins Brailler.
Because the Mountbatten has many features that can be confusing for a beginner, when the unit is first delivered, it is in Learn mode and can be used right away as a braille writer. A second mode, Advanced mode, allows you to enter commands by pressing the Command key and a combination of braille keys and the Enter key. I will describe further the advanced features that can be programmed in Part 2 of this article.
I was interested at first in how the Mountbatten compared in the Learn mode—its simplest option—to the familiar Perkins Brailler as it may be used with beginning students. Even in Learn mode, however, the student or teacher can enter commands to add features that can help a beginning braille student, and these commands will be described throughout this article. Commands are easy to turn on and can be turned off by simply entering the command again (which is referred to as a "toggle" feature).
Simple but Helpful Features
As someone who has used the Perkins Brailler, I had trouble putting the paper into the Mountbatten at first—it just felt unfamiliar. For example, the bar that holds the paper in place does not move. I had to slip the paper underneath it, and I found it tricky to put the paper in straight at first. I had also moved the right margin stop well to the right but forgot to move it back. When I loaded the paper and then turned on the machine, the embossing head moved so far to the right (called the Margin Search feature) that it went off the paper. The head crumpled the paper as it moved back toward the center of the machine. It was easy enough for me to fix this problem and to remember from then on to make sure that the right margin was in the correct position. After loading paper in the device a few times, I got the hang of it. It is not difficult—just different.
Once the paper is inserted, the Mountbatten is ready for immediate embossing and behaves reassuringly like the familiar Perkins Brailler, albeit with a different feel. The six braille keys are in the customary position, with keys for braille dots 1, 2, and 3 on the left and keys for braille dots 4, 5, and 6 on the right. The keys are arranged at a slight angle that is more ergonomic than the Perkins Brailler. The keys require only a light touch to press, a helpful feature for young students or those who lack the finger strength to depress the keys on the standard Perkins Brailler. The recorded speech provides instant feedback and reinforcement by announcing the letters that are formed or the names of the keys that are pushed.
There are two speech options: recorded speech and synthetic speech. Recorded speech, which is the default, is a digital recording of a man's voice with an Australian accent, easy to understand even for beginners who are not familiar with talking computers. Synthetic speech, available in Advanced mode, can be manipulated in ways that are familiar to people who use screen-reading software: pitch, rate, quality, and so on. Since new users of synthetic speech often have difficulty understanding it immediately, it makes sense to have the default be recorded speech, even though it is slower than synthetic speech. As users gain speed and accuracy, they can try synthetic speech by using the Command key on the Mountbatten and entering the correct code. The speech can even be turned off entirely with another command. (These are definitely commands that teachers could try with beginners.)
I was interested to notice that in both the Learn and Advanced modes, recorded speech announced the names of the letters, not the contraction or word. For example, if I brailled in the letter "b" and then a space, the Mountbatten said "b space," rather than the word but. It took some getting used to, to hear a question mark referred to as "low h." (In recorded speech, the Mountbatten will say some of the contractions that are key combinations, such as the, wh, and ch.) The teacher or student can hear the contracted braille read by putting the Mountbatten in Advanced mode and then into synthetic speech. This may be a feature that teachers will want to use with beginners who are learning contracted braille, even though it is considered an "advanced" feature.
The MIMic's LCD (liquid crystal display) is designed to show in print what is being brailled on the Mountbatten, a boon for classroom teachers and others who do not know braille but need to give feedback and reinforcement to students as they write. However, the MIMIC displayed the word in its contracted form as a default. For example, if I brailled the contraction part, the Mountbatten announced "dot 5 p," but the MIMic displayed the word part. This is a helpful feature for classroom teachers who do not know braille, but they may not understand why the Mountbatten will announce "w space" but then show the word will on the MIMIC. The teacher of students with visual impairments will need to provide some training to the classroom teacher, paraprofessional, or parent on braille contractions and how they work. The MIMic display can be changed to show a letter-by-letter depiction of what was entered on the Mountbatten by typing in the command for "grade 1" (uncontracted) braille into the Mountbatten. For beginners who are using uncontracted braille or invented spelling, this is a helpful option.
The MIMic turns off automatically after 15 minutes of disuse to save the battery. You have to hit the keys firmly to get it to follow commands. You'll know the MIMic is paying attention to you when you hear it beep. The MIMic that came with my unit accurately displayed the text when it was first turned on. But after the MIMic went into battery-saving mode and then was reactivated, it would not automatically display the text as it was entered in the Mountbatten. I had to keep pushing the Scroll Down button for it to display what I was brailling. It seemed to work better if I turned it off when I was not using it and then turned it back on.
Basic Embossing Features and Options
The Mountbatten leaves five spaces at the end of each line before moving to the next line. I found this irritating at times. For instance, I wrote the word we and then wanted to braille the word can, which would have fit on the same line, but the Mountbatten sent me to the next line instead. Then, when I was brailling quickly and wrote a long word at the end of the line, the Mountbatten hyphenated at the end of the line. I found this feature by accident. Sometimes it would hyphenate correctly (such as "refrig-erator") and sometimes not (such as "Washingt-on" and "chan-ge").
There are two ways to overcome this problem. The easiest is to use the command for Word Wrap, which will have the machine emboss a word only after the spacebar is hit. Then the Mountbatten will judge if there is enough room to put the word on the line or to move to the next line. This is the feature that the Mountbatten representative recommended. A second possibility is to put the Mountbatten in Manual mode. In this mode, the Mountbatten acts more like a Perkins Brailler; you have to hit the Line Down key to move to the next line. This means that you must think ahead to how much space is left at the end of the line or hyphenate the word yourself.
(An aside: When I learned braille on a Lavender Brailler back in the Dark Ages, space saving and maximizing each line was considered important. I wonder if teachers still teach students to do so, now that paper is inexpensive but time is not. Braille readers have gotten used to seeing large spaces at the ends of lines because of computer translation software that does not hyphenate; it simply moves a word to the next line. Also, in word processing with a computer, students are not taught to hit Return at the end of every line as people did with a typewriter. So should students be taught to use the Manual mode of the Mountbatten so they get used to thinking ahead as they braille to maximize the symbols per line? Should they learn to hyphenate and, if so, at what age? Or should teachers not worry about hyphenation anymore and focus instead on just teaching students to write? I am interested in hearing from teachers how they use braille devices to teach the writing process.)
The Mountbatten also erases errors. To erase a symbol, you must hit Backspace and the Correct Letter commands at the same time. The Mountbatten also replaces a letter with a space when you hit the Backspace and the Space keys at the same time. The correction feature is helpful for beginners, although I can imagine that some students will overdo it. I have had students who get so obsessed with correcting mistakes that they would continually erase or cross out their braille, rather than write first and edit later. Luckily, the Mountbatten has an editing feature in its Advanced mode, which will be discussed in Part 2 of this article.
You can control how heavily the Mountbatten impresses the paper. To braille on lightweight paper, you can hit the Command key and the left Function key simultaneously. The Mountbatten will say "down" and emboss a sample full cell. To braille on heavier paper, the Command key and the right Function key are depressed together. The Mountbatten will say "up" and again will emboss a sample full cell. Sometimes you will not want the full cell to appear, so the Embossing mode can be turned off first; the Mountbatten will announce "up" or "down" without the embossed full cell.
For brailling on heavy materials, you can set the Mountbatten to do the Multistrike feature. Any teacher who has tried to label thick file folders or plastic sheets will appreciate this feature. Teachers can also use smaller paper, such as index cards, to make flash cards. If a small piece of paper has been inserted and the Mountbatten cannot sense it, you can set the device to do "no paper operation," which tricks the Mountbatten into embossing on small slips of paper (although I would just use a slate instead). The options available to use different kinds of paper and materials for embossing certainly increase the flexibility of the device and set the Mountbatten apart from other braille writers.
The Graphics mode can be set in Learn mode—this is not an Advanced feature. This mode will create dots that are closer together, apparently with the idea that the teacher can create lines and other simple shapes. However, there was little information in the manual about how to use Graphics mode, other than how to turn it on. By playing around with this mode, I was able to make some unconvincing shapes using commands described in the manual on how to move around the page, such as up and down a column. Apparently, software and a tutorial are available that teach how to use this mode, but I did not have access to these resources to try them out.
One-handed mode is another option available in Learn mode, which would be helpful for students with physical disabilities. To turn on the One-handed mode, press Command, then k and u and Enter. In this mode, you must press the spacebar after each letter (or, to make a space, hit the spacebar twice). When you want to return to regular two-handed mode, you need to remember that it is still in one-handed mode and enter the command as such, which means you must hit k, then space, then u, then space, and then Enter, otherwise it will not toggle off again. The Mountbatten is fairly forgiving of people who do not hit the keys simultaneously, which is helpful for users who have less manual dexterity.
One other feature that teachers may be interested in for beginning braille readers and writers is an Advanced feature for Patterns, a popular braille reading series that is available from the American Printing House for the Blind. There are two ways to use this feature. First, the teacher can set the Mountbatten to speak certain sets of contractions, as they are introduced in Patterns, as the students braille, but not to speak others. Second, people who do not know braille can use the forward-translation feature from a keyboard connected to the Mountbatten, so it will only translate the Patterns contractions the students know and not emboss others. This feature will be described in more detail in Part 2.
Classroom teachers are sometimes concerned about the noise made by braille devices, afraid that they will distract other students. While in my experience, the sounds made my various adaptive devices quickly become part of the general hum of the classroom, there are ways to minimize the noise made by the Mountbatten. The speech can be controlled by turning down the volume (the volume control is on the front of the device), using headphones, or turning off the speech entirely. Controlling the embossing pressure and using lighter-weight paper will also make the Mountbatten quieter to use. The manufacturer suggests putting the device on soft rubber pads, such as two mouse pads, to minimize the noise.
The Mountbatten, like other electronic devices, may not be able to withstand the abuse that a Perkins Brailler can take. Say what you will about the Perkins, it is virtually indestructible. My coworker has seen a Perkins tumble down the stairs and still work. I have seen all kinds of strange things stuck in a Perkins, such as BandAids and once a shirt, yet I was always able to fix it easily.
Kitten Caboodle
My Mountbatten unit, on the other hand, had some difficulty after a showdown with my 6-month-old kitten, Lilli. Lilli was fascinated by the device, biting the embosser head, stepping on the keys, and digging around inside the machine. She made it beep alarmingly once, but I simply turned the machine off and then on again (as was recommended by the troubleshooting section of the manual), and it worked. For the most part, the Mountbatten was able to take kitten abuse with no trouble, claws and all, until Lilli grabbed the embossing head and stopped it from moving. The Mountbatten yelled at her repeatedly "braille head error." I turned the unit off to let it sit for awhile, but it still would not emboss and only made a loud beeping noise. By the next day, though, it was fine again and worked with no problem. Catastrophe was averted. (There are also reset commands available for such occasions.) That the Mountbatten was vanquished for several hours by a kitten, however, made me wonder how it could withstand an entire kindergarten class of children with curious fingers.
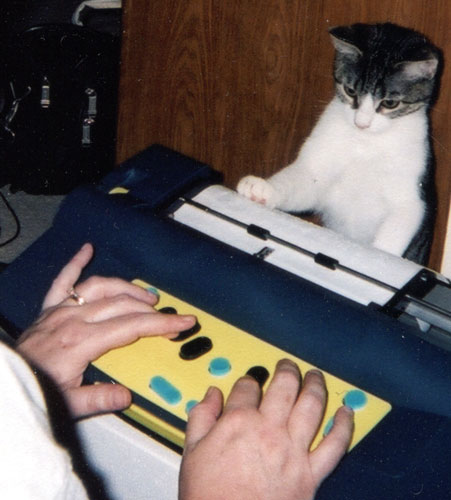
Caption: Lilli meets the Mountbatten.
Getting Help
I was disappointed with the Mountbatten's manual. I found it hard to follow, and it provided poor directions on how to use the many features that the Mountbatten offers. There were also inconsistencies in how the commands were described. For example, BS + S means "backspace plus the spacebar" not "backspace and the letter 'S'," which was a mistake I made several times. Other commands are shown, such as "spk r," and one has to know to put the space in the command and not type it in all together. So in some cases, the manual uses the letter "S" to indicate a space and in other places, the directions show an actual space. I also looked high and low for the directions on how to turn the Learn and Advanced modes on and off. Luckily, an excellent CD tutorial is available free of charge from Quantum Technologies, and it is well worth the teacher's and parent's time to go through it. The CD not only explains more (and more clearly) about how to use features of the Mountbatten, it allows for practice activities and feedback.

Caption: The Mountbatten Pro offers an array of options and features, including the ability to connect to a QWERTY keyboard, printer, PC, and the MIMic display.
More for More
So for a beginner, the Mountbatten has many features that the Perkins Brailler does not. The ease of depressing the buttons, the device's ergonomic design, its speech reinforcement, its ability to correct errors, and the visual display on the MIMic make it a wonderfully enhanced brailling device. For its high price (see the Product Information section), however, the Mountbatten must be better than just a souped-up Perkins Brailler—and it is. In the Learn mode, you can still set margins, tabs, line spacing, and centering; turn the embossing on and off; and save files to memory. In Part 2 of this article, I will consider the dizzying array of options and features that the Mountbatten Pro offers, such as those just mentioned, as well as forward and backward braille translation; the ability to connect to a QWERTY keyboard, printer, and PC; and the ability to create files that can be stored in the device. These are the capabilities of the device that send it off in the stratosphere compared to the humble Perkins Brailler and make its high price more justifiable.
Manufacturer's Comment
"We'd like to thank AccessWorld for this review and for Kitten Lilli's groundbreaking work. The issues we'd like to emphasise concern the literacy tasks and outcomes the Mountbatten enables, and these include enhanced opportunities for independent learning through multisensory feedback, increased excitement and motivation to write braille because the Mountbatten is considered "cool," and the integration of technology skills and braille skills from the earliest possible age. Specific skills that are augmented include navigating, formatting, and gaining technology concepts that enhance transition to other devices. The Early Braille Readers Project currently underway at Texas School for the Blind and Visually Impaired (see <www.tsbvi.edu/Outreach/seehear/summer04/braille.htm>) has found that all 20 pre-K to Grade 2 students using Mountbattens in the project quickly moved to Advanced mode. The Learn Mode increases the comfort level of teachers.
"Any desired combination of braille grade, speech output, and Mimic display can be selected, so that the needs of each individual student can be met. A free manual written by a teacher of visually impaired students in Canada is available at <www.setbc.org/res/mbpro/default.html> and provides the best guide to taking full advantage of all the Mountbatten's features."
Product Information
Product: Mountbatten Pro.
Manufacturer: Quantum Technology, P.O. Box 390, Rydalmere NSW 2116, Australia; phone: 61-2-9684-2077; e-mail: <info@quantech.com>; web site: <www.quantech.com.au>.
U.S. Distributor: Optelec, 321 Billerica Road, Chelmsford, MA 01824; phone: 978-392-0707 or 800-828-1056; e-mail: <optelec@optelec.com>; web site: <www.optelec.com>.
Price: $3,895.