Thin and Sleek: A Review of Two Flat-Panel Desktop CCTVs
This is an exciting time for users of desktop closed-circuit televisions (CCTVs), also known as video magnifiers, as we move from the standard television-like large monitors to sleek, thin film transistor–liquid display (TFT-LCD) panels. TFT-LCD flat-panel CCTVs have come into favor with many who prefer the look and size of a desktop CCTV that has a significantly thinner monitor than the traditional monitors. Two companies have taken on the challenge of creating new LCD flat-screen desktop CCTVs: Ash Technologies and the Tieman Group (Tieman-Optelec). Ash Technologies has created the Eclipse, a stylish single-unit flat-screen CCTV that collapses. The Tieman Group has developed the ClearView Flat Panel, a flat-screen CCTV that is placed on top of a slightly modified ClearView base.
Several years ago, Betacom created a TFT-LCD flat-screen CCTV called the VisAble Image. Persons with low vision found the design and thinner monitor to be a wonderful addition to the low vision community. Students, in particular, thought that the VisAble Image was "cool" and did not seem to mind using the device in their classes. However, the company has since gone bankrupt, and VisAble Image CCTVs are no longer in production. Given the present gap in the market, other manufacturers have attempted to create similar flat-screen desktop CCTVs. We are in the infancy stage of flat-screen CCTVs as manufacturers take their first baby steps to refine their designs.
The Testers
The Eclipse and the ClearView Flat Panel were tested by eight users with low vision, aged 8-55, in their homes, at work, and at school. Each user was familiar with using a desktop CCTV for reading and writing. The youngest child had two years' experience using a CCTV at school and at home, while the oldest person had over 20 years'; experience using a CCTV at home and at work.
Eclipse
Physical Description
The Eclipse is a sleek, black CCTV that is contained in one folding unit with a socket in the back for the power adapter to connect to the unit. The Eclipse pulls out of the box easily and is essentially ready to use, with the exception of plugging it in and unfolding the monitor. The monitor is neatly tucked into the horizontal "arms" that are attached at its bottom right and left sides. These arms bear the weight of the monitor. The camera is located underneath the monitor in a portion of the monitor that is cut out in a semicircle. Beneath the horizontal arms is the X-Y table, which comes with a simple sliding Lock button on the right side of the tray that controls the in/out movement of the X-Y table. The rotary knob on the lower right side of the X-Y table locks the side-to-side movement of the table. The X-Y table, the camera mounting arm, and the monitor are connected in such a manner as to keep the entire unit balanced when the monitor is moved forward to a vertical position.
The controls for the Eclipse are located at the bottom of the monitor and are easy to distinguish from one another both visually and physically. Ash Technologies uses audible tones that provide users with additional information about what the control button is doing (such as the on/off beep and three beeps for the lowest magnification level). All the control buttons are either circular or oval and will be discussed as they appear on the monitor from left to right.
The oval Focus button is located slightly to the left of the center of the base of the monitor and is imprinted with a black capital letter "F" to remind users what this button is for. Directly in the center of the base of the monitor and the button to the right of the Focus button are the Zoom buttons. The two buttons combined look like a large oval that has been sliced horizontally through the middle. The Zoom buttons have black arrows on them to help users figure out which button increases or decreases the magnification level. The top half-oval button is for zooming in and increasing magnification (the arrow points upward), while the bottom half-oval button is for zooming out and reducing magnification (the arrow points downward).
To the right of the Zoom buttons are three smaller circular Function buttons. The first button has a black square on it that gives you access to the Overview mode. This button enables you to locate a specific spot on the material being read by zooming out to get a view of the entire document. A target symbol pops up to indicate where you were looking on the page. Next to the Overview button is the Line Marker/Shutters button (indicated by an "X" on the button). This button allows you to place a line marker on the screen (the color of the line can be changed to meet one's preference) or to block off text above and below a "window" of text (shutters). Next to the Line Marker button is the Semicolors button (indicated by a clear circle on the button). Pressing this button enables you to change the color of both the letters and the background. There are four preset foreground/background color settings. However, you can program the Eclipse to use colors of your choice.
Farther to the right are the Brightness buttons, which control the intensity and contrast of the images on the monitor. These buttons look like a large oval that has been vertically sliced down the middle. The half oval on the left has an arrow pointing to the left (to decrease the brightness or contrast of the image), and the half oval on the right has an arrow pointing to the right (to increase the brightness or contrast of the image).
Next to the Brightness buttons is the Mode button. This oval button has three circles on it: a solid black circle, a white circle, and a gray circle. By pressing the Mode button, you can switch from Picture (color) mode to the two "reading modes": Positive mode (black text on a white background) and Negative mode (white text on a black background). A convenient feature of the Eclipse is its ability to remember your last reading mode. For example, if you were reading a book in Positive mode and decided to look at the photograph of the author on the back cover, you would press the Mode button until the Picture/Color mode appeared. After viewing the picture, you would press the Mode button once, and it would automatically return to the Positive mode. Finally, the button on the far right is the Power button. Pressing this button will turn the unit on and off.
Documentation
The Eclipse comes with a clear, easy-to-read, comprehensive user manual that is 15 pages long. The font is large enough and dark enough for most readers with low vision to see. The users aged 12 and younger had some difficulty understanding the language in the manual, but this would be a problem for most children of this age, whether visually impaired or sighted. The simple diagrams that accompany the text help you figure out what to do with the unit. In particular, the users whose first language is not English relied heavily on the pictures to figure out how to change the Eclipse's lightbulb. All the users who read the manual found the information on the control buttons to be useful. They especially liked the pictures of the symbols that are used throughout the manual, since they help users to locate specific information at a glance.
Setup
Setting up the Eclipse is easy and straightforward. The unit comes folded in the box with the power cable unplugged from the unit. After you lift the Eclipse out of the box, you place it on a flat surface about 4 inches from the edge of the table or desk. If the unit is placed too close to the edge of the table, it may fall forward. This point is stressed on the first page of the manual, which states that excessive weight that is placed on the reading table when the table is fully extended (if closer than 4 inches from the edge) may cause the unit to tip. To remind you of this potential problem, Ash Technologies has placed arrows and warning labels on the X-Y table to indicate where the maximum overhang is. However, these warning labels are not enough in and of themselves, since many of the young students forgot to check the position of the unit relative to the edge of the table. After several attempts to remind the youngsters orally of where to place the unit, I had to show them (in a safe manner) what would happen if the unit was too close to the edge. After this demonstration, all the students remembered what to do.
With the unit placed appropriately on the table, you place one hand on each side of the monitor and pull it toward you until the monitor reaches an angle that you find most comfortable. The monitor does not go beyond 90 degrees. For young children (or short adults), the 90-degree angle of the monitor may not be enough of an angle for optimum viewing, given the height of the table and the chair upon which the individual is seated. That is, the young children (and one older person) had to crane their necks backward because the monitor was not angled greater than 90 degrees (such as to 110 degrees). Alternative chairs and tables had to be located, so the height of the monitor would be ergonomically suitable for these users. Unfortunately, the height of the monitor is not adjustable; therefore, users have no choice but to find alternative ways to view the monitor comfortably if the standard position does not work for them.
Although the Eclipse is not intended to be a portable CCTV, the fact that it is collapsible makes it easy to move from one location to another and to put it back in the box for storage.
Ease of Use
Reading
Once the users found a comfortable viewing position, reading with the Eclipse came easily. Since all the users were familiar with how to read with a CCTV, the only skills that required some fine-tuning were figuring out what the control buttons did and getting the feel of the X-Y table's movement. All the users commented how smoothly the X-Y table moved and how they liked the auditory feedback made by some of the control buttons (such as the Power button, Mode button, and Zoom button).
The users enjoyed being able to increase and decrease the size of the text using the Zoom button. Each person commented that the continuous increase or decrease in the size of the text was a positive aspect of the electronic zoom feature. Only one individual commented that the "refresh rate" of the digital image was somewhat slower when the magnification was increased or decreased. That is, the image became slightly blurred as the letters changed in size.
The users tended to prefer the Positive mode for reading most documents; however, one 11th-grade student with albinism preferred the Negative mode. The users also noted that there was a slight "fuzziness" in both the Positive mode and the Negative mode around three-dimensional objects (such as a pill bottle, a can of beans, and a wristwatch) that they found to be distracting. The high school students found that text near the center of a thick textbook tended to look fuzzy when in the Positive or Negative mode. One 10th-grade high school student then switched to Picture/Color mode (instead of the Positive mode) and was able to read the text more easily without the fuzziness. If the material could be placed flat on the X-Y table, as with a single sheet of paper or a thin softcover book, then the fuzziness was no longer apparent. All the users found the Picture/Color mode to be useful for looking at pictures, diagrams, or charts with colored components. They also commented that the text below the pictures was easy to read and did not appear to be fuzzy.
After practicing using the line marker and changing its color, the users tended to prefer the preset yellow line marker. Only the two users who were older (40 and 55 years old) preferred using the shutter feature; they both commented that it made it easier to read materials like a newspaper whose columns and small print tended to make reading a full screen of words more difficult for them. It is interesting to note that the teachers of students with visual impairments found the shutter feature to be of great use with young students (more than did the students themselves) for helping the students to learn how to isolate questions on tests or to focus on only a few math questions at one time. In some cases, the extra visual clutter of a screen full of text tended to make it more difficult for the young students with low vision to complete their school assignments.
Users who were more technologically savvy than others enjoyed playing with the Video Control menu and the Manual Focus features. One user (an accountant with low vision) completely changed the Eclipse's settings to make reading budget reports and journal entries (usually written on light green paper with red lines) "easier on his eyes" than the preset options.
Writing
Generally, all the users found the Eclipse easy to use for writing once they learned where the unit needed to be positioned for safe use. To see what they had written, the users needed to pull the X-Y table toward them until their pens fell in the sightline of the camera lens. Consequently, the X-Y table often extended over the edge of the table or desk on which it was placed. At first, the young students did not trust that the device would not tip forward, but, with practice, their comfort level increased. In one instance, however, a student, a seventh-grader with low vision and additional disabilities (paralysis of his left side and a cognitive delay), placed too much weight on the X-Y table as he attempted to print his name. He could not hold himself up properly without using his right arm or hand to bear his weight at the same time that he printed. As a result, he could not use the Eclipse for writing.
Some of the users found it frustrating that the tops of their markers and pens hit the base of the Eclipse's monitor when the monitor was placed at a 90-degree angle. Only after they removed the lids of the pens or markers to make them shorter could they write freely under the unit.
How Good Is It?
Overall, the Eclipse is a versatile desktop flat-screen CCTV that is compact and relatively lightweight. Compared with Betacom's VisAble Image, the Eclipse is not as ergonomically designed, nor does it offer the same degree of monitor tilt as did the VisAble Image. Similarly, as a unit, the Eclipse is not as sturdy in its design as it could be. Nevertheless, it offers many excellent features and is close to being as good as the VisAble Image was.
What Would Make it Better?
Stabilizing the unit would be a priority when considering any changes to the design of the Eclipse. Users should not have to worry that the CCTV will fall off a table when he or she is using it. Also, enabling the monitor to tilt to an angle greater than 90 degrees would be a significant improvement, so that users would be able to angle the monitor downward if their seats were too low for proper body alignment with the monitor. Similarly, adding a height-adjustable feature to the monitor would be helpful in such circumstances. Finally, making the unit available with a 17-inch monitor would also improve its overall usefulness.
The Bottom Line
The Eclipse is a good first attempt by Ash Technologies to fill the gap in the market left by the bankruptcy of Betacom. Further redesign is needed for the Eclipse to be a direct replacement of the VisAble Image and a device that persons with low vision would purchase.
ClearView Flat Panel
Physical Description
Tieman's ClearView Flat Panel comes in two boxes. One box contains the base unit with a metal stand, power cables, a video cable, a remote "feature pack," a hexagonal bolt for attaching the monitor to the base, the user manual, and four installation tools. The second box contains the LCD screen.
The base unit appears to be the same base unit as the Tieman's previous CCTV models, the ClearView 517 or 700. The base unit and the monitor (in most cases) are beige--the color that is typically used with ClearView CCTVs. The feature pack, camera, and VGA output slots are located on the left side of the back of the unit's base. The AC output and input slots are also located on the back of the base unit, but on the right side.
The camera is located near the front underside of the camera mounting arm that extends over the X-Y table. Attached to the back of the camera mounting arm is a height-adjustable arm that extends above the camera mounting arm. The LCD movable 15-inch or 17-inch screen is attached to the end of this adjustable arm. Located behind the X-Y table on the stationary part of the base are the trays for the power adapter (on the left side) and the remote feature pack (on the right side). The remote feature pack can be moved and placed on either side of the Flat Panel; it has a coil cable (similar to a telephone cord) that enables you to place it wherever it is most convenient.
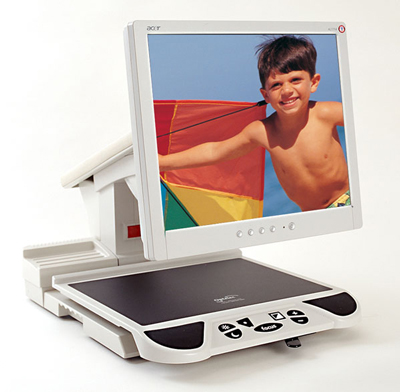
Caption: The ClearView Flat Panel is a bulky but versatile flat-screen CCTV with adjustable height and tilt features.
The table-locking lever is located just under the control buttons at the front of the X-Y table. Sliding the lever fully to the right blocks all movement of the table. By sliding the lever all the way to the left, you can move the X-Y table only left or right. Unrestricted movement of the table occurs when the lever is placed in the middle position.
The black control buttons are located on the bottom center of the X-Y table, and each button contains a symbol in contrasting white. Starting from the left and moving right, the control buttons are as follows: the Brightness and Contrast Control buttons, the Pointer button, the Focus button, the Mode button, and the Zoom buttons. The Brightness button has a symbol of a sun on it to indicate that it is used to increase the contrast in Picture mode and the brightness in Reading mode. The button below the Brightness button has the symbol of the moon on it to indicate that it is used to decrease the contrast and brightness.
When you press the Pointer button (shaped like an arrow with a small dot in the center), the Flat Panel activates a red dot on the X-Y table. This feature is intended to help you locate the part of the text that is being magnified on the screen. The red dot is not visible on the monitor, only on the X-Y table.
The large, oval Focus button actually has the word focus spelled out on it. Since the ClearView Flat Panel arrives in Autofocus mode, if you want to adjust the focus manually, you must press the Pointer and Mode buttons simultaneously to switch to Manual mode. Then, you press the Focus button until the image is brought into focus. Given how infrequently this button is likely to be used, I am not sure why the Focus button is so large and prominently placed in the center of the control panel.
The Mode button (a square button divided diagonally into a white half and a black half) enables you to switch among Picture mode (to view pictures and photographs), Reading mode (black text on a white background), and Reverse Reading mode (white text on a black background). Finally, the Zoom button with the plus symbol increases the level of magnification, while the button below it with the minus symbol decreases the level of magnification.
The remote feature pack contains buttons for several added features. The oval Camera button (located on the top left side of the pack) is used when an external camera is connected to the unit and allows you to switch between the external camera and the Flat Panel camera. The oval Line button (located under the Camera button) allows you to switch among a horizontal reading marker, a vertical reading marker, or no reading marker. The oval Window button (located below the Line button) controls the horizontal, vertical, or no-windows markers. The windows block out distracting text that appears above or below the text that is being read. The Position knob is located in the center of the pack and allows you to position the lines and windows anywhere on the screen. The Width knob (located to the right of the Position knob) enables you to widen or decrease the amount of space between the lines or windows. Finally, the Color Select button (a longer horizontal button below the Position and Width knobs) allows you to choose among eight color combinations of foreground and background.
Documentation
The documentation for the ClearView Flat Panel is simply laid out, in a large, easy-to-read font with bold headings. The user manual is printed in English, German, and French. Simple diagrams of the unit's parts and pictures of the control panel symbols are helpful to readers of all ages, although young children will have difficulty understanding the content. Unfortunately, some errors were noted in the English version of the user manual, including the term screen diameter and the subsequent recording of the screen-size information. The manual should use a clearer term, such as screen size (diagonal), to help the reader understand what information is being listed in the particular box. Also, the manual states that the monitor is a 15-inch monitor, but Tieman's web site lists the screen as 17 inches. After measuring the diagonal of the monitor I used for this evaluation, I determined that the screen size was actually 17 inches. The user manual needs to indicate that the monitor comes in either 15 inches or 17 inches, as that is not made clear in any of the documentation.
Setup
Setting up the ClearView Flat Panel is somewhat complicated. The device is shipped in two boxes: one box for the base and additional items and one box for the monitor. All the users, especially the young students, had difficulty assembling it independently. They all asked for help and stated that they would not be comfortable assembling the unit by themselves--they worried that they might drop the monitor while trying to mount it to the adjustable arm.
Setting up the CCTV also requires you to connect several cables and place the two packs in their appropriate "holding" trays. The users commented that this setup was even more difficult and time consuming than the setup for the standard ClearView CCTVs (for example, the ClearView 317, 517, or 700).
Since both the monitor and adjustable arm are movable, the users typically needed a few minutes to figure out how high they wanted the monitor to be and at what angle. All the users commented that they liked the height-adjustable feature of the Flat Panel, as well as the fact that the monitor is able to move beyond 90 degrees. The latter feature was especially useful for small children with low vision.
Ease of Use
Reading
All the users found that reading with the ClearView Flat Panel was easy. The X-Y table moved smoothly under the touch of each user, including a student with low vision who had additional disabilities (paralysis of his left side and a cognitive delay). Since all the users had previously used a ClearView CCTV (either the 317 or the 517), switching to the Flat Panel was relatively simple. The 17-inch flat screen was well received, and the users especially liked the height-adjustable arm and how far forward (and backward) the monitor was able to tilt. These two features made the Flat Panel more accessible than the Eclipse for users who were short or who required unique seating positions. Although the Flat Panel is not as sleek or modern looking as the Eclipse, the adjustability of the monitor's height and angle make it better ergonomically.
When a thick textbook was tested in the Positive, Negative, and Picture modes, the ClearView Flat Panelperformed well in all three modes; that is, little, if any, fuzziness was noted. There was only a slight delay when the focus changed from one type of text to another.
If the user moved the X-Y table too quickly, the screen often appeared to glow white, and the letters became blurred. Although the screen is considered to be high resolution, there is still a slight pause between moving the table and getting a clear, focused image on the monitor.
Writing
All the users found that writing with the ClearView Flat Panel was easy, since they did not have to remove the lids of their pens or markers to write underneath it, as they had to do with the Eclipse. They could write confidently knowing that their markers or pens would not hit the monitor. Generally, the users preferred writing in the Positive mode (black on white), but the student with albinism preferred to use the Negative mode.
The student with additional disabilities who needed to lean on the X-Y table to write under it was able to do so without the unit tipping forward. He was able to lock the table into place independently and then print slowly and carefully while leaning on the table for support.
How Good Is It?
The ClearView Flat Panel is a large, versatile flat-screen CCTV with adjustable height and tilt features that users will like. The comfortable X-Y table and accessible control switches make it easy for persons with low vision to use. Unfortunately, the weight, bulkiness, and cumbersome setup of the Flat Panel are negative features that need to be considered if and when the Tieman Group decides to improve this device.
What Would Make it Better?
The Tieman Group was on the right track by designing a flat-screen CCTV that has an adjustable monitor height and angle. However, by placing the monitor and adjustable arm on the already existing ClearView base, the manufacturer seems to have limited the overall design of the device. The ClearView Flat Panel is heavy and awkward to move, in addition to being difficult to assemble. The main difficulty with this CCTV is that it is made up of two separate pieces of equipment that must be bolted together properly to be used safely and efficiently. If the Flat Panel is to be transported anywhere, the CCTV must be disassembled properly, so that the monitor and camera are not damaged. Users may find this not to be worth the effort. Perhaps the Tieman Group can figure out a way to make the Flat Panel a single unit that is more compact.
The Bottom Line
The ClearView Flat Panel is another good first attempt by a different company, the Tieman Group, to fill the gap in the market left by the demise of the VisAble Image CCTV. The Flat Panel is able to do some of the things that the Eclipse is not able to do (such as adjusting height and proving a greater degree of monitor tilt and a greater clearance for writing), but it also requires further design changes. In particular, users would prefer to have a one-piece unit (as opposed to the two pieces that make up this unit) that weighs less and that is easier to assemble.
Given the pros and cons of both devices, neither device has met all the design and function challenges that are involved in creating the best-possible flat-screen desktop CCTV. The ClearView Flat Panelcomes out slightly ahead of the Eclipse with regard to function; however, designwise, the look and size of the Eclipse are much more appealing than are those of the Flat Panel. Both companies may want to reconsider their current designs, since users with low vision will probably wait for a better version to be created before they make the financial commitment to purchase a TFT-LCD flat-screen CCTV.
The devices used in this evaluation were provided by the Microcomputer Science Centre, Mississauga, Ontario, Canada.
View the Product Features as a graphic
View the Product Features as text
View the Product Ratings as a graphic
View the Product Ratings as text
Product Information
Product: Eclipse.
Manufacturer: Ash Technologies, B5, M7 Business Park, Naas, Ireland; phone: 353-45-88 22 12; e-mail: <info@ashtech.ie>; web site: <www.ashtech.ie>.
American Distributor: Freedom Vision, 615 Tami Way, Mountain View, CA 94041; phone: 650-961-6541 or 800-961-1334; e-mail: <info@freedomvision.net>; web site: <www.freedomvision.net>.
Price: $3,295.
Product: ClearView Flat Panel.
Manufacturer: Tieman Group, P.O. Box 592, 3235 ZH Rockanje, The Netherlands; phone: 31 0 181-409444; web site: <www.tieman.com>.
American Distributor: Optelec U.S., 321 Billerica Road, Chelmsford, MA 01824; phone 978-392-0707 or 800-828-1056; e-mail: <optelec@optelec.com>; web site: <www.optelec.com>.
Price: $2,895.