You Can Take It with You II: A Review of Two More Portable CCTVs
Portable closed-circuit televisions (CCTVs) have become much-sought-after devices for persons with low vision who want to have access to print materials while on the go. In Part I of this article (see the July issue of AccessWorld), three portable CCTVs were reviewed—(the Olympia (by Telesensory), the Traveller (by the Tieman Group), and the Pico (by Telesensory). The first two might be considered portable CCTVs, while the Pico is a lightweight pocket-size magnification device. In this review, I present two more portable CCTVs: the QuickLook (from Ash Technologies) and the Assist Vision Slider AV-300 (from the TIMES Corporation). At the end of this article you will be able to use the rating chart to compare all five products and decide for yourself which portable CCTV best suits your needs.
The QuickLook and the Assist Vision Slider AV-300 (hereafter referred to as the "Slider") were tested by a number of teenagers (aged 12–17) and adults (aged 22–63) with low vision at home, at school, and in the community while engaging in everyday tasks. Some of the individuals who tested these products had also tested the portable devices in the previous review of portable CCTVs, thereby providing some interesting comparative information about all the devices.
QuickLook
Physical Description
The QuickLook is a highly portable, lightweight magnification device (comparable to the Pico reviewed in Part I of this article) that comes with a built-in rechargeable battery, charger, cable, and protective carrying case with a belt loop, shoulder strap, and wrist or neck strap. It is 1-inch thick and fits in the palm of your hand. The power input and charging-indicator light are located at one end of the device, and the camera encasement is located at the other end. The attractive dark blue and metallic gray colors give the QuickLook a sleek, modern look. The 4-inch screen makes up most of the 6.5-inch-long face of the device. The camera rotates easily from the "Off" position, where the camera encasement is flush with the face of the device, to the "On" position, where a 90-degree turn (until you hear the "click" sound) of the camera encasement starts the device. To turn off the device, simply rotate the camera encasement the other way. This is a unique way to turn the device on and off, since most CCTVs have an On/Off button. A brief high-pitched tone (for "on") or low-pitched tone (for "off") is emitted as the camera is rotated into position.

Caption: The QuickLook.
There are two buttons on the QuickLook that control the brightness and the mode. The Brightness button comes with four settings to suit individual needs and is located on the side of the QuickLook near the camera encasement. The Mode button is located on the opposite side of the device, also near the camera encasement. An exciting feature of the QuickLook is the tone that is emitted while the user presses the Brightness or Mode buttons. As the brightness is increased, the tone increases in pitch, and as the brightness is decreased, the tone decreases in pitch. When the mode is changed (from color to black on white or white on black), a tone is emitted to indicate that the mode has changed. However, this tone does not change in pitch. All the participants who tested the QuickLook found this feature to be useful and opted not to silence the audio output (an option that is available by pressing the Mode button as the device is turned on). They enjoyed the additional feedback that the tones gave them.
Documentation
The QuickLook comes with a manual that describes all the device's functions in simple, clear terms. Since the participants found the QuickLook so easy to use, many of them chose not to refer to the manual at first. After trying out the device and wanting to learn more about its features, they then referred to the manual. Two participants found the color of the paper on which the manual was printed (black print on yellow paper) to be too bright and stated that they preferred the usual black print on white paper. Similarly, all the participants who read the manual stated that they preferred reading Arial font, rather than the font used in the manual (probably Times New Roman).
Setup
The QuickLook is easy to set up and use. Simply take the device out of its case, rotate the camera, and place it on top of the print. For writing, it is just as easy to set up—the user rotates the camera even farther out until he or she hears the "click" sound. According to the participants who tested all five portable CCTVs, the simplicity of the QuickLook could not be matched by any other.
Operation
Reading. Like the Pico, the QuickLook is easy to use and is able to magnify to 5X, slightly more than the Pico's 5X maximum magnification level. For individuals who require less than 5.5X magnification, the QuickLook can be moved farther from the printed page, thereby reducing the magnification level.
The QuickLook moves smoothly across most reading materials (large and small books, thick and thin books, single sheets, pictures) in any direction. It does not have sliders (small wheellike rollers) underneath it, so it is not restricted in its direction in any way. If the camera is placed on the right side of the device and the user slides it along a single sheet of paper, it often gets caught on the edge of the paper. However, if the device is flipped around so that the camera is on the left side, it slides smoothly across most flat reading surfaces.
To read print material on curved or odd-shaped surfaces (for instance, bottle labels, soup cans, a telephone keypad, or the spines of books), you must hold the device slightly above the object to read the print. On curved surfaces, the print image is the clearest in the center of the QuickLook's display. The participants found that they had to adjust the brightness level on curved surfaces because a bright spot in the center of the display was more obvious and distracting. This bright spot was not evident when the QuickLook was placed over flat surfaces.
Writing. All the participants enjoyed using the QuickLook for writing. Setting up the device for writing involves a simple turning of the camera until it clicks into place. Two clicks are audible when you rotate the camera: one click to indicate it is in the reading position, and the second click to indicate it is in the writing position. All the participants found the QuickLook to be the easiest of all the portable CCTVs for writing (as long as magnification greater than 5X was not needed). All that is needed is for the user to find his or her place under the camera and to begin to write. If the user is right-handed, the left hand slides the device along the page as he or she writes with the right hand. If the user is left-handed, the user holds the device with his or her right hand. The positioning of the camera lens is such that the pen never hits the QuickLook and is about 1 inch away from the device. Ash Technologies has created an ingenious way to mount the camera so it does not interfere with the user's physical writing space.
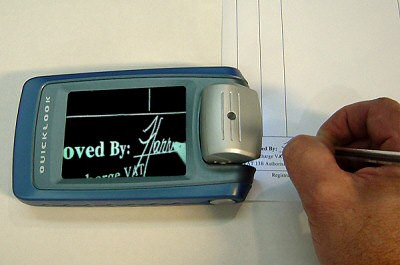
Caption: Using the QuickLook for writing.
How Good Is It?
The QuickLook is an outstanding pocket portable CCTV that incorporates audio output with its basic features of color and brightness. Its lightweight, sleek, modern design and high-quality LCD (liquid crystal display) make it an invaluable tool for gaining access to print material. All the participants who used both the QuickLook and the Pico preferred the QuickLook, primarily because of the way it could be used for writing.
What Would Make It Better?
- A user manual printed in Arial font (at least 16-point font) and on white or buff paper instead of yellow paper.
- The addition of a zoom lens that could bring items into view that are farther away—this would make it the best and most versatile device on the market today.
The Bottom Line
The QuickLook is an excellent pocket magnification device that surpasses the already-well-respected Pico pocket magnifier. Its versatility for both reading and writing tasks cannot be matched by any other pocket magnifier tested to date. For anyone who is looking for a portable magnifier that can fit inside a purse or backpack, the QuickLook is the answer.
Assist Vision Slider AV-300
Physical Description
The Slider is a heavier (4.2 pounds) portable CCTV (comparable to the Olympia and the Traveller reviewed previously) that comes with a built-in rechargeable battery in the main unit, an adjustable monitor (6.4-inch diagonal display), a camera holder, a detachable camera, an AC adapter, a power cable, a video cable, and a camera input terminal (for connection to a camcorder for distance viewing; camcorder not included). There are three parts to the Slider: the main unit, with the monitor located on the top of it; the camera holder within which the camera unit slides; and the camera unit.

Caption: The Slider's camera unit can be used separately from the base. The prongs must touch the reading material to position the unit correctly.
The base of the main unit is rectangular, and the control switches (On/Off switch, Brake knob, and Mode/Contrast knob) that push in to change the mode (from color to black on white or white on black) and turn the knob (to adjust the contrast) are located on the front side of the base. Behind the unit are the video 1 (camera input) terminal, video 2 (video input) terminal, and camera select switch. The LCD monitor can be tilted forward, to the right or to the left. Four small wheels or rollers are located under the main unit for horizontal movement of the device over the print material. Because the device is designed to move horizontally across a page, it is somewhat resistant to vertical movement and any vertical movement is choppy. The participants found it easier to pick up the Slider instead of trying to slide it vertically.
The camera holder can be mounted to the main unit in three places: at the back of the unit, on the right side, or on the left side, depending on the task and whether the user is right- or left-handed. For example, if the user is right-handed, he or she should mount the camera on the right side of the unit in order to write. To use the Slider for a typical reading task (for example, reading handouts in class or reading the newspaper at a breakfast counter), the camera is best mounted at the back of the unit. The camera unit has a zoom ring located approximately 1 inch from the top and connected to the main unit by a cable. The camera unit can be removed from the holder for both reading and writing; however, the cable can get in the way if the user does not pay attention to where it is. Two adjustable inch-long "prongs," or white pins (as labeled in the manual), extend from the bottom of the camera unit. These prongs must touch the surface of the object being viewed, because the camera's focus is fixed and the prongs maintain the appropriate focal distance from the reading surface. If the user does not place the prongs on the surface of the print material and holds the camera unit further from the paper, the image will not be clear.
Documentation
The Slider's manual is written in large, easy-to-see black print, on off-white 8 x 11.5-inch paper (not the typical 8.5 x 11-inch paper). The instructions for use are somewhat complicated because the Slider can be used in several different ways to accomplish reading and writing tasks, and it can be connected to a camcorder for distance viewing. Also, some of the instructions are difficult to understand, perhaps because the manual was translated from Japanese to English.
Setup
The Slider is somewhat cumbersome to set up because it has three separate parts that need to be put together, along with a cable that needs to be connected to the main unit. The teenage participants had the most difficulty setting up the device and required a great deal of practice to be able to set it up independently. The adult participants eventually figured out how to put the device together, but had to read through the manual to find out where to put the camera holder. Unfortunately, the instructions are written in such a way that one cannot locate the information at a glance; the user typically ends up reading the entire manual before he or she finds the information being sought.
Although the manual states that the brake should be switched on when the Slider is not in use or when it is on a "slightly tilted surface," it does not state that the brake is necessary in these circumstances because on angled surfaces, the weight of the device causes it to slide downward quickly and unexpectedly. A more strongly worded warning may prevent users from letting the Slider accidentally slip off a desk.
Operation
Reading. The Slider can be used to enlarge print materials for reading in two ways: as a whole unit with the camera mounted to the main unit or by holding the camera unit only and sliding it over the print. When the user reads using the first method (whole unit), the Slider tends to catch on the edges of books and single sheets of paper. The camera unit can be mounted on either the left or the right side of the main unit or behind it. Most participants found that mounting the camera unit behind the main unit was the best option. They were able to trace lines of print relatively easily while they looked at the monitor that had been angled to their preferred positions. When the camera unit was mounted on either side, they found that the entire unit tended to get caught on the edges of the paper. Moving from side to side was relatively smooth, but all the participants complained that the rollers under the unit made vertical transitions difficult.
When reading using the second method (holding only the camera unit), the participants found that they could read more quickly because the camera unit did not catch on the edges of the paper, and the unit could be moved vertically or horizontally with ease. Similarly, by holding the camera unit, they could read print on curved surfaces (such as pill bottles or cans). The only difficulty with this method was the positioning of the monitor on the main unit. For example, a right-handed individual would hold the camera in his or her right hand with the print material on the right side of the table. The monitor and main unit would be slightly to the left of center. Thus, the individual had to turn his or her head to the left to view the monitor while his or her right hand moved across the paper. All the participants needed to practice reading this way and to experiment with different locations and monitor angles before they were comfortable using the Slider.
Finally, the Slider offers an additional feature: It can be hooked up to a camcorder for distance viewing. When I attempted to connect a camcorder to the Slider, it took some time before everything could be connected properly. When the camcorder was finally connected, the image appeared to be grainy, perhaps because of the quality of my camcorder. Given the mediocre results, the process of connecting a camcorder to the Slider may not be worth it for users with low vision who want quick access to print materials in the distance. Other devices are readily available that have been designed specifically for distance viewing (e.g., the VisAble Video Telescope, Flipper, and monocular telescope). Perhaps the TIMES Corporation was trying to do too many things with one device.
Writing. As with reading, the Slider can be used in two ways to accomplish writing tasks: as a whole unit with the camera mounted to the main unit or by holding the camera unit only and sliding it along as you write. Using the first method, you must slide the entire unit along a line of print as you write. Given the bulk and weight of the unit, this was not a graceful task. The participants, especially the teenagers, found it too big to maneuver over print on a regular-size desk. The edges got caught on the side of the paper, regardless of where the camera unit was mounted (on the left side for those who wrote with their left hands or on the right side for those who wrote with their right hands). Filling out forms or fill-in-the-blank question sheets took a lot longer using this method, since the participants needed to move the Slider vertically to find the correct blank to fill in.
Using the second method, in which the camera unit is held on its own, the participants found it easier to fill out forms and fill-in-the-blank sheets. As long as they could coordinate moving the camera unit with one hand while writing with the other hand, writing was much faster. However, the younger students had to be reminded to make sure that the camera unit was positioned properly (with the arrow pointing upward), because the image would appear upside down or sideways on the monitor if it was improperly positioned.
How Good Is It?
The Slider has many good features, such as the ability to use the camera unit to read on curved or flat surfaces and for quick writing tasks. The display is reasonably sized, clear, and can be angled to meet individual preferences. Material can be enlarged to as much as 17.5X, thereby making it a good choice for users who have very low vision. However, as a whole, the Slider was not well received by the participants. In fact, it ranked third among similar-sized portable CCTVs (against the Olympia and the Traveller reviewed in the last issue). The Slider has the added features of being able to connect to a camcorder or a television, but the process of connecting these peripherals detracts from the ease and convenience users might expect from a portable CCTV.
What Would Make It Better?
- Reduce the weight.
- Make it easier to put the device together.
- Add vertical rollers to make movement in every direction possible and smoother.
- Revise the manual to include easier-to-understand directions.
The Bottom Line
The Slider attempts to address all the features an individual with low vision would want in a portable magnification device. However, its versatility tended to work against it, since the participants found it to be too cumbersome and complicated to use. The key to a successful, popular portable CCTV is its ease of use and portability.
Manufacturers' Comments
Ash Technologies
"Thank you very much for the Quicklook review. Regarding the reviewers' comments on the manual (black print on yellow paper, also choice of font), these have been duly noted and the advice of the students will be taken on board and the necessary changes will be made."
TIMES Corporation
"The Assist Vision Slider was designed with all the features you would want from a desktop CCTV, plus the added function of portability. It is ideal for students in a classroom setting who want to see both the textbook materials as well as information on the chalkboard (using the one-step video camera connection), as well as active adults who don't want to be limited to one reading area—they can take the Slider from room to room or even out shopping and other places. The battery is already built into the unit so there is no additional connection or weight, and the left-right rollers move in a horizontal direction so that the user can easily stay in a straight line. Users need only to move the unit slightly toward them to move to the next line. A one-page Easy Connection and Instruction Manual is also included (in addition to the more comprehensive instruction manual) for instructions at a glance. Please refer to our web site for further information on our products."
The author thanks the Microcomputer Science Centre in Mississauga, Ontario, Canada, for providing the five portable CCTVs evaluated in Parts I and II of this article.
View the Product Features as a graphic
View the Product Features as text
View the Product Ratings as a graphic
View the Product Ratings as text
Product Information
Product: QuickLook
Manufacturer: Ash Technologies, B5, M7 Business Park, Naas, Ireland; phone: 353-45-88 22 12; fax: 353-45-88 22 14; e-mail: <info@ashtech.ie>; web site: <www.ashtech.ie>.
American Distributor: Freedom Vision, 615 Tami Way, Mountain View, CA 94041; phone: 650-961-6541 or 800-961-1334; e-mail: <info@freedomvision.net>; web site: <www.freedomvision.net>.
Price: $795.
Product: Assist Vision Slider AV-300
Manufacturer: TIMES Corporation, 1-6-11, Takatsukasa, Takarazuka-City, Hyogo, 665-0051 Japan; phone: 81 797 74 2206; fax: 81 797 73 8894; e-mail: <info@times.ne.jp>; web site: <www.times.ne.jp>.
Price: $2,195.